Despite its many benefits, peritoneal dialysis (PD) uptake is quite poor in many countries. For example, in Malaysia, around 12% of all patients with end stage kidney disease (ESKD) are on PD). One barrier to use of this modality is the placement of access. Tenckhoff catheters are traditionally inserted by a surgeon in Malaysia, but there are several methods which can be employed by nephrologists as well. Dedicated PD access programs have been shown to increase use of PD and avoid urgent start hemodialysis with bloodstream catheter placement. In this blog post we will review the technique of inserting a Tenckhoff catheter via the Seldinger technique at bedside. This is not a procedure which should be casually undertaken, but with proper training, nephrologists can take a more active role in access creation for their patients.
Anatomic Considerations
The intra-abdominal portion of the catheter is placed through the rectus abdominis muscle .
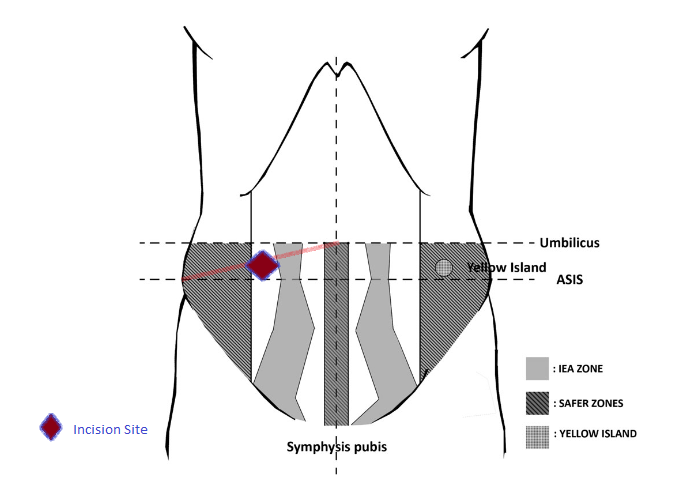
The initial incision should be 1cm medial to the midpoint of the anterior superior iliac spine and the umbilicus, depicted in purple, to avoid the superficial epigastric arteries. In patients with a larger abdomen, adjustment of the initial incision must be made to compensate for movement of abdomen with movement.
Check out this Renal Fellow Network article on point-of-care ultrasound (POCUS) in PD – POCUS is your friend when trying to find the edge of the rectus!
Preoperative preparation
- Patients should be fasted, anticoagulation should be held, and the patient should empty their bladder fully prior to procedure.
- If possible, conscious sedation should be used with concurrent vitals and cardiac monitoring. Depending on your institutional policy, an anesthesia or pulmonary physician may need to be present for emergency airway support.
- Sterilize the area of insertion with an antiseptic solution.
- Infiltrate local anesthetic such as lidocaine subcutaneously and into the deeper tissues
Exposing the Rectus Abdominus
To expose the rectus muscle, make a horizontal skin incision of around 1-2 cm with a scalpel and dissect in a blunt fashion until the anterior rectus sheath is visible.
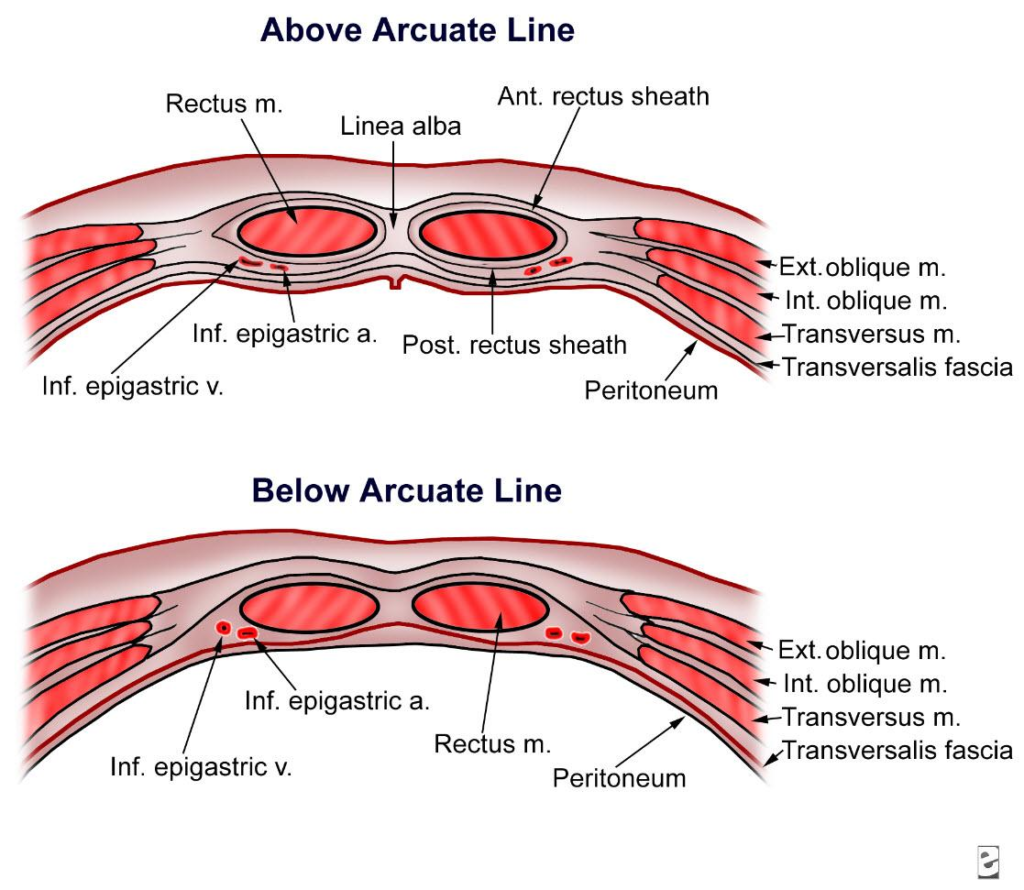
Once the rectus sheath is identified, infiltrate anesthetic through the rectus muscle in the anticipated trajectory of the catheter. WARNING- This step has potential for complications as the inferior epigastric artery runs deep to the rectus and can be punctured. Care should be taken to avoid the epigastric artery and POCUS can be helpful.
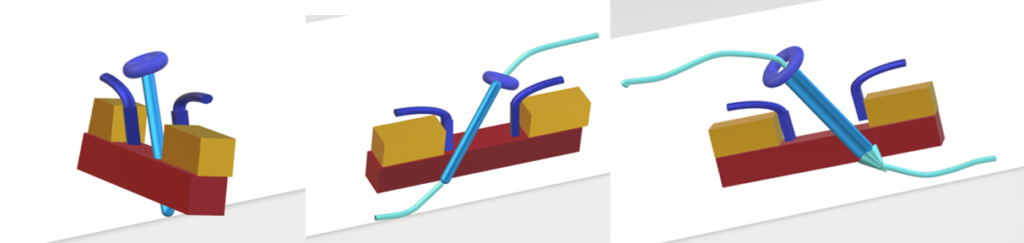
Breaching the Rectus via Seldinger Technique
This is a “blind” technique in which the tenckhoff catheter is inserted using a guidewire.
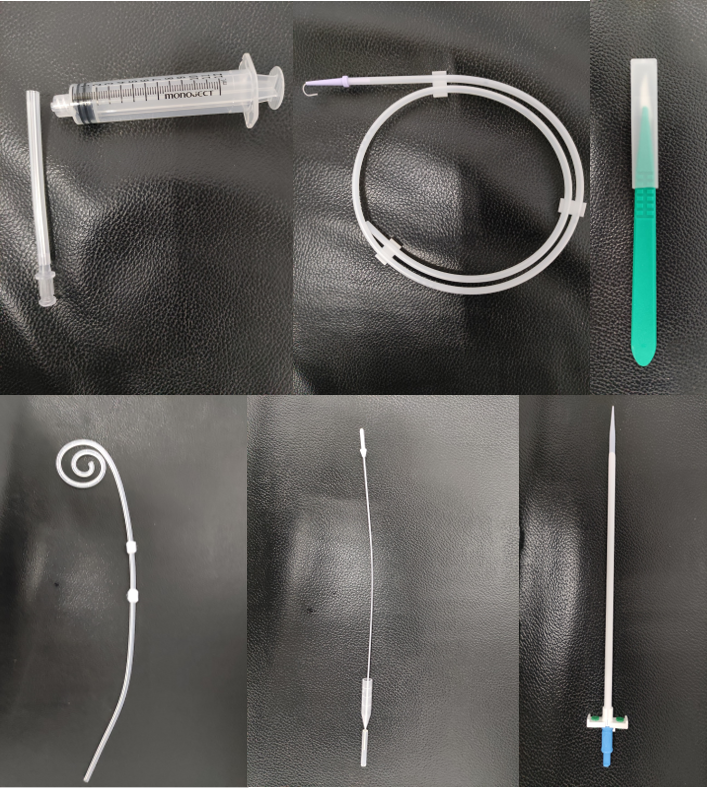
A typical Seldinger tenckhoff catheter set contains the following items:
- Needle and syringe
- Guidewire
- Scalpel
- Dilator and pull apart sheath
- Tunneling tool
Advance the introducer needle through the rectus muscle. Ultrasound can also be used to identify the needle tip as it is passed through the rectus and into the abdomen.
Advance the pull-apart sheath and dilator as a single unit along the guidewire into the abdominal cavity.Next, insert the tenckhoff catheter via the sheath, pulling the sheath apart slowly as the catheter is advanced over the guidewire. For this technique, it is easier to leave the cuff just above the anterior rectus sheath.
Once the catheter is in place, test by flushing the catheter to ensure smooth flow.
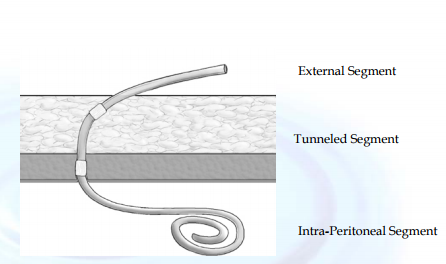
Tunneling the subcutaneous segment
For standard double cuffed catheters it is important to plan the subcutaneous tunnel so the external cuff is at least 2cm from the exit site to prevent infection.
Attach the tunneling device to the catheter and pull the catheter out through a small incision in the skin. You can use forceps to make a pocket for the superficial cuff as you pull the catheter through.
Attaching the connector and transfer set
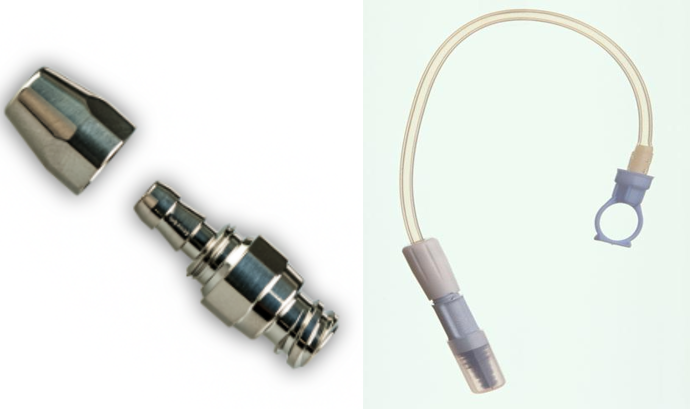
Once the catheter is tunneled, connect the 2-part titanium connector and lock it in place by rotating. Next, attach the transfer set to the titanium connector.
Closure
Closure of the subcutaneous tissue and skin can be done with absorbable or nonabsorbable sutures, taking care not to damage the catheter.
Final Testing and Flushing
One the catheter is in place and the skin is sutured, test the catheter by connecting a bag of PD fluid using the transfer set and lavage small volumes of PD fluid to clear any blood from the cavity. The catheter can be used for low volume exchanges (up to 1000ml) immediately after insertion!
As you can see, insertion of a PD catheter is not a simple or risk-free procedure. However, with experience, nephrologists can learn to secure lifesaving dialysis access for their patients.
Yudisthra M Ganeshadeva, MD is an NSMC intern 2020 and private practice nephrologist based in Johor Bahru, Malaysia. Follow him on twitter at @tulunsokit

Seldinger technique done at bedside.
Shall be useful in more patients with access issue.
Amazing
Thank you very much for these very nice information, I hope you share videos or photos explaining the procedure,, with my appreciation 🌹🌹🌹
Excellent!